Bottom round is a flavorful, inexpensive — and tough! — cut of meat. It comes from the well-used muscle of the steer’s upper rear leg. There are a couple good methods for cooking bottom round roast beef to keep it tender and tasting good: cold oven and sous vide.
Option 1: “Cold” oven method
The best oven-cooked way I’ve found to make roast beef edible starts with preheating a oven to 500F. Once preheated, place your roast in the oven and cook for 5 minutes per pound. Then turn off the oven, and don’t open the door! Let your beef sit in the “cold” oven for an hour. Remove after an hour, slice it very thinly — using a rotary meat slicer, if you have one, is easiest — and serve.
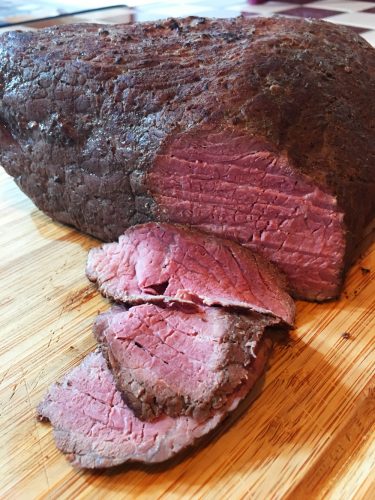
The meat will be medium rare, which is the optimal temperature for roast bottom round. Any less well done, and the collagen won’t have a chance to soften. Any more well done, collagen will disappear altogether and the fibers will tighten, making the beef very dry and tough to chew. Cooking medium rare is the perfect sweet spot, and cold oven cooking is not a bad option if you have limited time.
Option 2: Cooking sous vide
A better option, if you have the time and equipment, is cooking sous vide. It takes 30 hours to cook this way, so you do need to plan ahead.
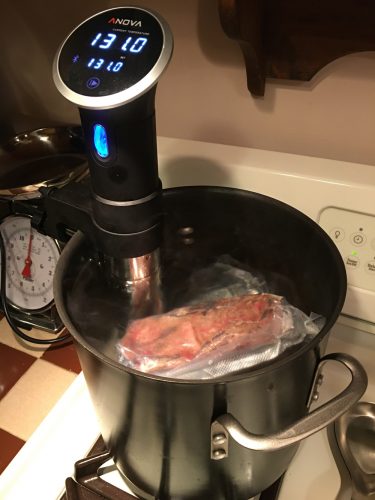
Cooking sous vide requires an immersion circulator that keeps the temperature of the water bath you’re cooking in constant and the water circulating. I happen to have an Anova immersion circulator. There are a number of other brands on the market. If you do a search for sous vide circulators, you’ll find several to compare.
Sous vide cooking also requires the beef be vacuum sealed in a plastic bag. I have a Food Saver vacuum sealer. Again, do some research online if you don’t already have one. Some suggest you can put the beef in a zip lock bag and force the air out. I found getting all the air out difficult with other items I’ve tried, and with some air in the bag you’ll need something to hold the bag under water. To me it’s worth getting a vacuum sealer — plus you can use it to store lots of other food items.
The third nice-to-have item is a culinary torch for finishing. More on that in a moment.
Step 1 – Start heating your water
Fill a deep stock pot 3/4 full with tepid water from the tap. Attach your immersion circulator so it sits in the pot without touching the bottom. Turn it on and set to 131F.
Step 2 – Prepare your bottom round cut
Start heating a cast iron skillet to 350F. It will take a few minutes. If you don’t have a thermometer, just make sure the skillet is really hot.
Rub the bottom round all over with olive oil. Sprinkle with a little kosher salt. Sear in the pan on all sides. You’re just trying to get a little flavor from the browning at this stage, not trying to cook it. Once it’s seared on all sides and the ends, take it out of the pan to cool.
Step 3 – Vacuum seal
While your seared beef is cooling down, seal one end of a food saver bag large enough to hold the roast.
After the roast is cool, rub it all over with Dijon mustard (or whatever other rub you like). Give the roast a few more sprinkles of kosher salt, and put the roast in the bag. You can then add garlic cloves and fresh herbs to the bag. I like to add a couple small branches of rosemary.
Vacuum seal the bag, and you’re good to go to the cooking step. As a precaution, I double-bagged and sealed my roast the first time. It turned out not to be necessary — the first bag held together just fine.
Step 4 — Cook for 30 hours
Once your water has reached 131F, place your bagged and vacuum sealed bottom round in pot. Make sure it’s beneath the surface of the water. Set your timer for 30 hours. It takes that long for the collagen to liquify at this temperature, or so I’ve read. The result is great, so I’m going with that explanation.
Keep an eye on the water level and top off as needed. I only had to do this once, but your mileage may vary.
Step 5 — Remove, slice, and eat!
The resulting roast will be as tender as prime rib. You can slice it thinly for sandwiches, or cut it into thick steaks and sear to finish.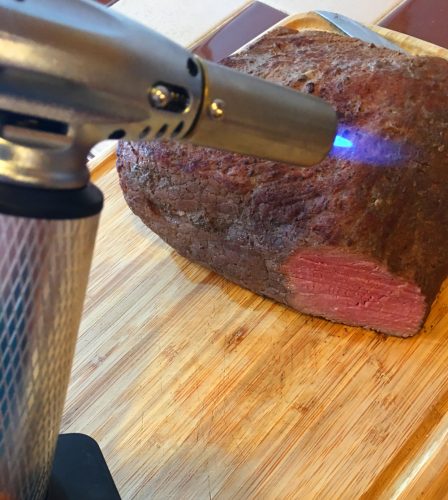
A culinary torch is useful for finishing the sear on steaks. While one side is searing on the bottom of your cast iron skillet, you can use the torch to simultaneously sear the top side. If you’re leaving it as a whole roast, it’s easier to use the culinary torch to sear the outside of that as well.
I haven’t tried varying my sous vide cook times yet to see if it impacts the flavor or consistency. When I do, I’ll post an update!